
最近終於學會了讓物件貼齊nurbs平面位移的方法! 只要使用pointOnSurfaceInfo跟幾個運算節點就能做到!
同樣地,為了簡化流程所以這次也寫了一個工具!
Finally learned how to align objects to NURBS plane displacement!
It can be achieved by using pointOnSurfaceInfo and a few calculation nodes!
Similarly, I wrote a script this time to simplify the process!
那麼底下就來介紹一下如何做到吧!
首先需要一個nurb plane以及一個帶有3層group的物件
First, create a NURBS plane. You can use the corresponding tools in a 3D modeling software to create a NURBS plane.
Next, prepare an object with three layers of groups.

然後到node editor新增pointOnSurfaceInfo這個節點,將nurb plane的shape串聯上去。
這邊需要注意的是記得打勾pointOnSurfaceInfo節點的Turn On Persentage!
Then, in the node editor, add a "pointOnSurfaceInfo" node and connect it to the shape of the NURBS plane.
Here, it's important to remember to check the "Turn On Percentage" option in the "pointOnSurfaceInfo" node.

接下來,在物件最上層的group新增兩個attr,用來記錄等等會輸出給pointOnSurfaceInfo節點使用的u 、v 數值。
Next, add two attributes to the top-level group of the object to record the u and v values that will be output to the "pointOnSurfaceInfo" node.

將剛剛新增的attr串連到兩個 addDoubleLinear節點上。
Connect the newly added attributes to two "addDoubleLinear" nodes.

接著在node editor新增一個nurbsCurve節點,這是一個完全無法在view Port看到的curve,是為了等等要結合上面兩個addDoubleLinear節點而創建的!
Next, add a "nurbsCurve" node in the node editor. This is a curve that cannot be seen in the viewport, and it is created for the purpose of combining it with the two "addDoubleLinear" nodes later on.

然後,將group最底層的物件連接上一個mult節點的input 1,然後再輸出到剛剛創建的nurbsCurve。
input2設置成0.05或是其他任何數值都可以(介於0與1之間),這麼做是為了讓物件不要在nurbs plane上位移太快像飛一樣。
Then, connect the object in the bottom layer of the group to the input 1 of a "multiply" node, and then output it to the previously created "nurbsCurve".
Set input 2 to 0.05 or any other value (between 0 and 1). This is done to ensure that the object does not move too quickly on the NURBS plane, resembling flight.
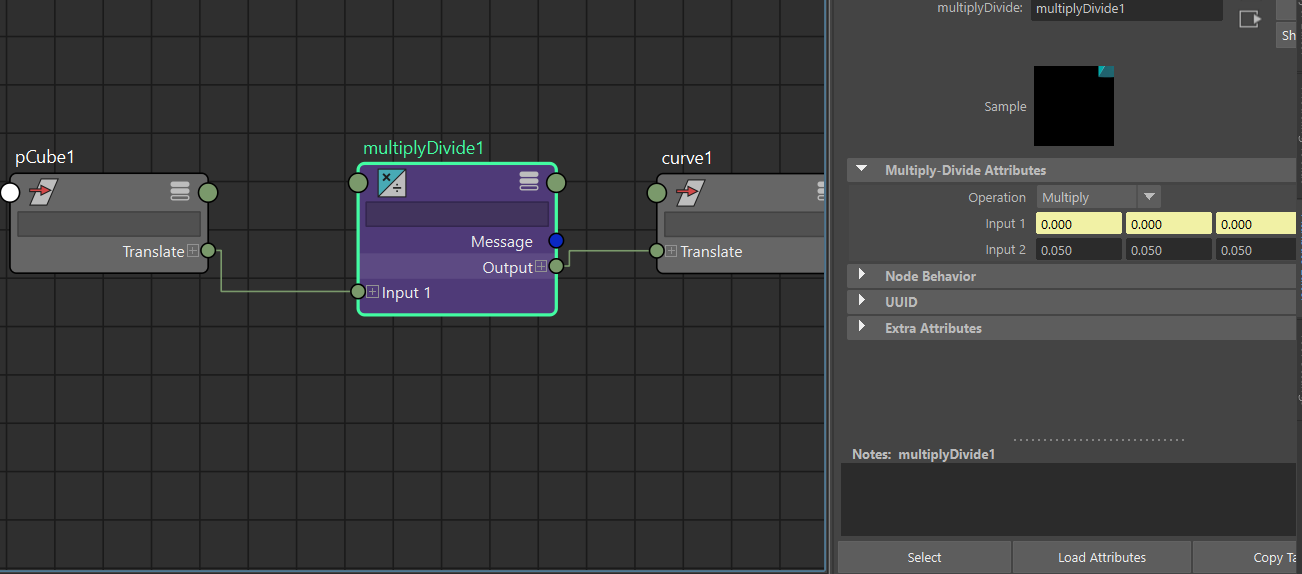
現在,把nurbsCurve的其中兩個軸向接到addDoubleLinear上,它可以是XYZ裡面的任意兩個軸向,這邊我使用X跟Z。
Now, connect two axes of the "nurbsCurve" to the "addDoubleLinear" node. It can be any two axes from XYZ. In this case, I will use X and Z.

現在,將他們輸出到一開始創建的pointOnSurfaceInfo節點上!
Now, output them to the "pointOnSurfaceInfo" node that was created initially!

緊接著,我們回到物件的第二層group上,將它跟物件透過mult節點串聯連起來。
可以看到這個mult的input2全都被我設定成-1,這是為了要抵銷等等會產生的雙重位移!
Next, go back to the second layer group of the object and connect it to the object using a "multiply" node.
You can see that all the input 2 of this "multiply" node are set to -1. This is done to counteract the double transform that will occur later on!

現在,我們將pointOnSurfaceInfo的Position再輸出回去給group3!
Now, let's output the "Position" of the "pointOnSurfaceInfo" back to group3!

現在只要位移物件,就可以發現他已經可以貼著nurbs平面移動了,不過目前還只有單純的位移,物件並沒有隨著nurbs表面起伏而選轉,接下來就是要處理這個問題!
Now, when you move the object, you'll notice that it can adhere to the NURBS plane. However, currently, it only undergoes simple translation, and the object doesn't rotate along with the undulations of the NURBS surface. The next step is to address this issue!
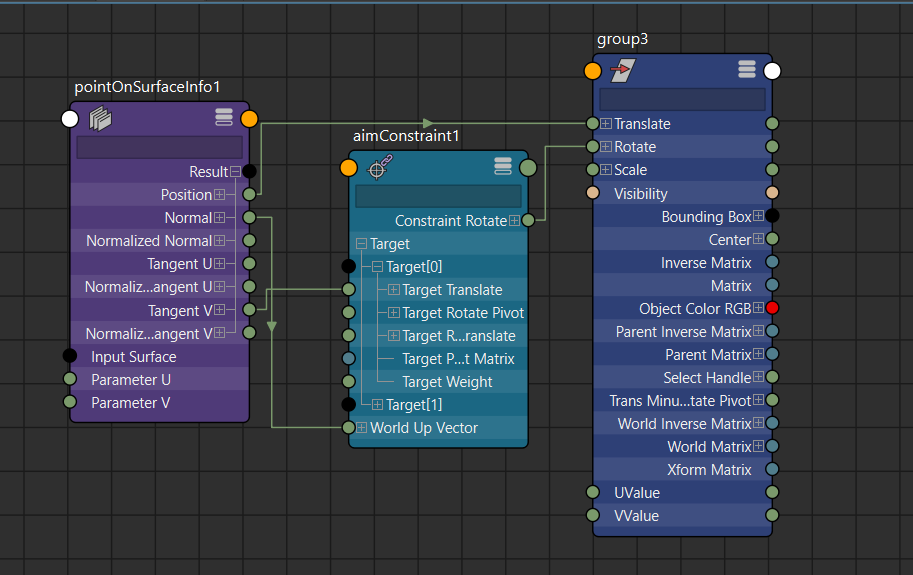
我們直接在node editor新增一個aimConstraint節點,然後將pointOnSurfaceInfo的 TangentV、Normal輸出給它,最後,再把它輸出到group3的rotate上!
Let's directly add an "aimConstraint" node in the node editor and connect the "TangentV" and "Normal" outputs from the "pointOnSurfaceInfo" to it. Finally, output it to the "rotate" attribute of group3!
再次移動物件,可以看到它已經完全緊貼著nurb表面在移動了!
這邊也可以發現,我們軸向的位移好像相反了,當拖動X軸時是上下位移,Z軸則是左右,所以我們可以再回去節點那邊將addDoubleLinear的input交換!
Great! Now, when you move the object, you'll see that it is perfectly aligned and moving along the NURBS surface!
You may have noticed that the axis displacement seems to be reversed. When you move along the X-axis, it affects the vertical displacement, while the Z-axis affects the horizontal displacement. To fix this, you can go back to the node editor and swap the inputs of the "addDoubleLinear" node!
這次我將curve的translateX接到V value,Z則是U value。
This time, I will connect the "translateX" of the curve to the "V" value, and the "translateZ" to the "U" value.

現在使用上更加直覺了!!!
Now it's even more intuitive to use!!!
看到這裡,已經完成了大致上的設定了,不過或許有人會疑問group3上面的u v value的用意。
這兩個數值是為了讓我們可以定位『物件的初始位置』而創建的,也就是說如果我們想要獲得『物件與nurbs plane最靠近的點』的位置,那我們就需要將這個數值記錄起來,方便之後使用。
底下就稍微紀錄如何獲取物件的初始位置吧!
假設,我想要知道cube目前在nurbs plane上的位置。


這個時候就需要pointMatrixMult、closestPointOnSurface這兩個節點,透過他們,我們可以得知cube在nurb plane上的u v 位置是多少!
如下圖可以得知數值是 0.505、0.496。

現在,我們將cube的位移數值歸0,然後回到group3,將剛剛得到的u v value輸入進去我們一開始創建的attr,可以看到cube的位置已經移動到我們剛剛放的地方,同時他的translate還是保持歸零的狀態,這樣一來就可以方便key各種動態了!!
Now, let's reset the cube's translation values to zero and go back to group3. Input the previously obtained "u" and "v" values into the attributes we created at the beginning.
You will see that the cube's position has moved to the location we specified earlier, while its translation remains at zero. This allows for easy keyframing of various dynamics!


0 留言